User Guide
Notor is a personal CRM, developed for faculty mentors at NUS to manage their mentees. NUS faculty mentors tend to have many mentees who they might not meet often, but they are still expected to understand their mentee’s situations and provide useful advice. A personal CRM (CRM stands for Customer Relationship Manager) like Notor is a useful aid to track information and organize information about mentees, which hugely benefits forming meaningful connections. However, Notor can still help people outside our target audience in situations where one must manage many contacts and need to take notes quickly.
Notor is a desktop application optimized for use via a Command Line Interface (CLI) while still having the benefits of a Graphical User Interface (GUI). If you can type faster than the average typing speed, the CLI is likely faster than alternatives on the market.
Key features of Notor are:
- Powerful Organization to manage many mentees, with powerful user customisation
- Group mentees, and place groups into subgroups for greater control
- Add tags to mentees and sort by tags to easily identify metadata about your contacts
- Archive contacts you are no longer actively mentoring, but keep them in your Notor to retrieve at any time
- Export data to serve as a backup.
- Clean note-taking system
- Take notes concurrently with meeting mentees through no-frills text files
- Drop time stamps whenever you update your information and meet with the mentee effortlessly
- Fast CLI
- Commands with short forms
- Works offline for better performance
Table of Contents
- Table of Contents
- Using this User Guide
- Quick Start
- Command Breakdown
- Filtering with Notor
- Miscellaneous information
- Tips on Using Notor
- Command Summary
- FAQ
- What’s next!
- Appendix: Tutorial
Using this User Guide
If you’re new to Notor, hop over to Quick Start to install and begin using it. If you already know what you want, use the Table of Contents to find the feature you are looking for, or the Command Summary to view all commands available.
If you’ve used Notor for a while and are looking to get the best out of Notor, ‘level-up’ by reading our Tips on Using Notor.
Some terminology that might help when referring to Notor:
- List pane : The panel located on the right, which is used to display the list of persons or groups
- View pane : The panel on the left, used to view notes, such as general notes
- Note Window: The pop-up window you may use to edit and add notes
- Command Box: The box on the left pane, underneath the view pane, where you may type commands.
Pay attention to these callouts:
Quick Start
1. Setup
Ensure you have Java 11 or above installed in your computer. You can install Java 11 from here.
2. Installing the project
Download the latest notor.jar here, and copy the file to the folder you want to use as the home folder for your Notor. The home folder is where the data that Notor uses will be stored.
3. Running the application
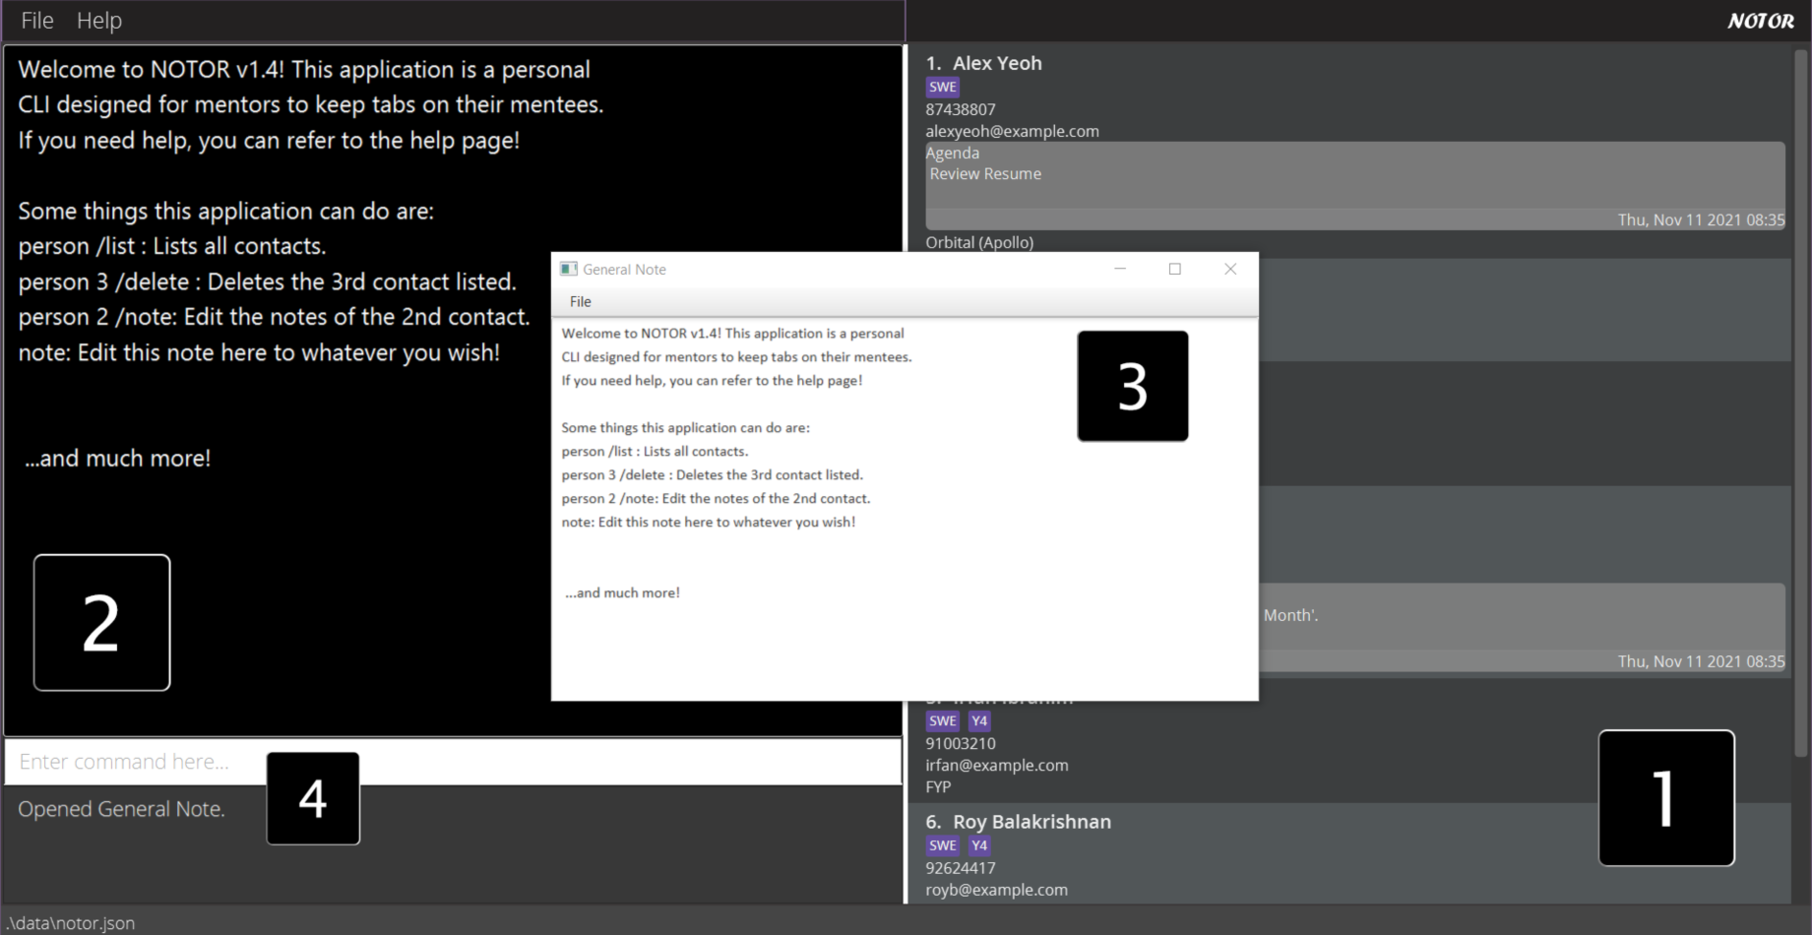
Double-click the file to start the application. If you have set up Java 11 correctly, the application should open, and the GUI similar to below should appear in a few seconds.
Note how the app contains some sample data.
4. Try Running Examples!
Type the command in the command box and press Enter to execute it. e.g. Typing help and pressing Enter will
open the help window.
If you’d like a guided tour of a few of Notor’s features, go to Appendix: Tutorial to try Notor out. We recommend this if you have never used Notor before.
Otherwise, you can jump right into it! Here are a few other commands you can try:
-
person /list: Lists all contacts. -
person 3 /delete: Deletes the 3rd contact (contact with index number 3) shown in the current list. -
person User /create: Creates a person named User. -
group Orbital /create: Creates a group named Orbital. -
person 3 /add g:Orbital: Adds the person with index 3 to the group Orbital. -
group /list: Lists all groups. -
group 1 /note: Edits the group note for the group with index number 1. -
group 1 /create n:Artemis: Creates a subgroup Artemis inside the group with index number 1. -
clear: Deletes all contacts. -
exit: Exits the application.
Refer to the Command Breakdown below for more details on each command.
Command Breakdown
What follows is a detailed breakdown of all the commands Notor has available and what they do. All the commands have a shortened command format to make typing them easier.
Notes about the command format:
- Words in
UPPER_CASEare the parameters to be supplied by the user.
e.g. inperson /create (n:NAME),NAMEis a parameter which can be used as/create n:John Doe. - Round brackets
()refer to COMPULSORY arguments.
e.g.(g:GROUP_NAME)means that the group name must be entered at that position. - Items in square brackets are optional.
e.g.(n:NAME) [g:GROUP_NAME]can be used asn:Elton g:Orbitalor asn:Elton. - Items with
… after them can be used multiple times including zero times, with a comma separating terms.
e.g.[t/TAG…]can be used as ` ` (i.e. 0 times),t/tag1, tag2, tag3etc. - Parameters can be in any order.
e.g. if the command specifiesg:GROUP_NAME sg:SUBGROUP_NAME,sg:SUBGROUP_NAME g:GROUP_NAMEis also acceptable. - If a parameter is expected only once in the command, but you specified it multiple times, only the last occurrence of the parameter will be taken.
e.g. if you specifyp:12341234 p:56785678, onlyp:56785678will be taken. - Extraneous parameters for commands that do not take in parameters (such as
help,exitandclear) will be ignored.
e.g. if the command specifieshelp 123, it will be interpreted ashelp.
General Commands
Viewing help
Opens a help window with a summary of commands, as well as a link you can copy to get to this full user guide.
| Format | Short Format |
|---|---|
help |
h |
Clearing all entries
Clears all entries from Notor. This means that all your contacts, as well as the groups you keep them in, will be removed.
| Format | Short Format |
|---|---|
clear |
c |
Editing the General Note
Opens a note window to edit the General Note.
| Format | Short Format |
|---|---|
note |
n |
Exiting the program
Exits the program and saves your data.
| Format | Short Format |
|---|---|
exit |
e |
Exporting data
Exports all the data of Notor into a CSV file to Notor’s home directory.
| Format | Short Format |
|---|---|
export |
exp |
You can usually find the exported data in the home directory that contains Notor. The data file indicates the exported data, and the time and date when you exported the data.
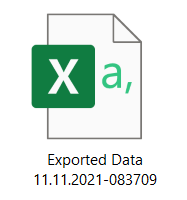
The data exported will be displayed as follows:

Working with people
The base functionality of Notor is allowing you to maintain notes on people who you mentor. These are the commands you can use with the person prefix to manage your contacts.
Creating a person
Creates a person’s contact card within Notor. When creating this person, you can pass optional arguments to fill out more information about them in a single command.
| Format | Example | What the example does |
|---|---|---|
person (NAME) /create [p:PHONE] [e:EMAIL] [t:TAG1,TAG2,...] [g:GROUP_INDEX] |
person John Lim /create p:91119111 e:notor@notor.com t:scholar g:1 |
Creates the contact John Lim, with a phone number of 91119111, and email of notor@notor.com. John is tagged with scholar and belongs to the group at index 1
|
p (NAME) /c [p:PHONE] [e:EMAIL] [t:TAG1,TAG2,...] [g:GROUP_INDEX] |
p Dhruv Chopra /c p:92229222 e:dhruv.chopra@u.nus.sg t:AI, Crypto g:2 |
Creates the contact Dhruv Chopra, with a phone number of 92229222, and email of dhruv.chopra@u.nus.sg. Dhruv is tagged with AI and Crypto, and belongs to the group at index 2
|
![]() Notes on parameters:
Notes on parameters:
- Creates a person with the
NAME. This name cannot start with a number. - Optional arguments:
-
PHONE: Phone number of the person. -
EMAIL: Email of the person. -
TAG1,TAG2..: Tag(s) that describe the person. -
GROUP_INDEX: Index of the group in Notor to add the person to.
-
- The person cannot have the same name as someone else in the group.
Adding a person to a group or subgroup
Adds a person at the given index INDEX to a specified group. To add a person to a subgroup, include the subgroup parameter.
| Format | Example | What the example does |
|---|---|---|
person (INDEX) /add (g:GROUP_NAME) |
person 1 /add g:Orbital |
Adds the person at index 1 to the group Orbital
|
p (INDEX) /a (g:GROUP_NAME) |
p 2 /a g:Alumni |
Adds the person at index 2 to the group Alumni
|
person (INDEX) /add (g:GROUP_NAME sg:SUBGROUP_NAME) |
person 3 /add g:Orbital sg:Artemis |
Adds the person at index 3 to the subgroup Artemis which is contained within the group Orbital
|
p (INDEX) /a (g:GROUP_NAME sg:SUBGROUP_NAME) |
p 4 /a g:Alumni sg:Class 2010 |
Adds the person at index 4 to the subgroup Class 2010 which is contained within the group Alumni
|
Deleting a person
Removes the contact and the data saved for a person from Notor.
| Format | Example | What the example does |
|---|---|---|
person (INDEX) /delete |
person 1 /delete |
Deletes the person at index 1
|
p (INDEX) /d |
p 3 /d |
Deletes the person at index 3
|
Editing a person
Edits the data of the person at the index INDEX in the List Pane and replaces the fields specified with the new parameters.
| Format | Example | What the example does |
|---|---|---|
person (INDEX) /edit [n:NAME] [p:PHONE] [e:EMAIL] |
person 1 /edit n:Amira e:amira.hannah@gmail.com |
Changes the name of the person at index 1 to Amira and also change their email to amira.hannah@gmail.com
|
p (INDEX) /e [n:NAME] [p:PHONE] [e:EMAIL] |
p 2 /e n:Tan See Kiat p:93339333 |
Change the name of the person at index 2 to Tan See Kiat and also change their phone number to 93339333
|
![]() Note:
Note:
- Please specify at least one field to be edited.
- Optional arguments:
-
NAME: Name of the person. -
PHONE: Phone number of the person. -
EMAIL: Email of the person.
-
- You cannot edit the name of the person to the same name as someone else in Notor.
Removing a person from group
Removes a person from a group or a subgroup. To remove a person from a subgroup, include the subgroup parameter along with the group it is under.
| Format | Example | What the example does |
|---|---|---|
person (INDEX) /remove (g:GROUP_NAME) |
person 1 /remove g:Orbital |
Removes the person at index 1 from the group Orbital
|
p (INDEX) /r (g:GROUP_NAME) |
p 2 /r g:Final Year Project |
Removes the person at index 2 from the group Final Year Project
|
person (INDEX) /remove (g:GROUP_NAME sg:SUBGROUP_NAME) |
person 1 /remove g:Orbital sg:Group A |
Removes the person at index 1 from the group Group A which is the subgroup of Orbital. The person is still in the group Orbital
|
p (INDEX) /r (g:GROUP_NAME sg:SUBGROUP_NAME) |
p 2 /r g:Research sg:AI focus |
Removes the person at index 2 from the group AI focus which is the subgroup of Research. The person is still in the group Research
|
Taking notes for a person
Opens a note window pop-up to take notes in.
| Format | Example | What the example does |
|---|---|---|
person (INDEX) /note |
person 1 /note |
Opens the note window which belongs to the person at index 1
|
p (INDEX) /n |
p 2 /n |
Opens the note window which belongs to the person at index 2
|
Clearing notes of a person
Removes the note of the person at the given INDEX in the List Pane.
| Format | Example | What the example does |
|---|---|---|
person (INDEX) /clearnote |
person 1 /clearnote |
Removes the note of the person at index 1
|
p (INDEX) /cn |
p 2 /cn |
Removes the note of the person at index 2
|
Tagging a person
Adds tags to an existing person. Please specify at least one tag to be added.
| Format | Example | What the example does |
|---|---|---|
person (INDEX) /tag [t:TAG1,TAG2,...] |
person 1 /tag t:friends,family |
Tags person with index 1 with friends and family
|
p (INDEX) /t [t:TAG1,TAG2,...] |
p 2 /t t:friday |
Tags person with index 2 with friday
|
![]() Note:
Note:
What are tags? Well, tags can be used to flag information about a person that you want to highlight and find later. Tags are searchable, while notes are not. Some ideas of what you could use tags for are …
- Areas of interest the mentee has
- Graduation year
- Where they are currently or have previously worked
- Outstanding qualities they might have
- The day you usually meet this mentee
Untagging a person
Removes tag(s) from an existing person.
| Format | Example | What the example does |
|---|---|---|
person (INDEX) /untag [t:TAG1,TAG2,...] |
person 1 /untag t:friends,family |
For the person at index 1, remove the tags friends and family
|
p (INDEX) /ut [t:TAG1,TAG2,...] |
p 2 /ut t:friday |
For the person at index 2 , remove the tag friday
|
Clearing tags from a person
Removes all the tags from an existing person. Use with caution.
| Format | Short Format |
|---|---|
person (INDEX) /cleartags |
p (INDEX) /ct |
Archiving People
Archiving people allows you to only view the contacts you are actively managing, while still keeping the information of older mentees within Notor. You might also want to view the Export command. You can restore archived mentees at any time.
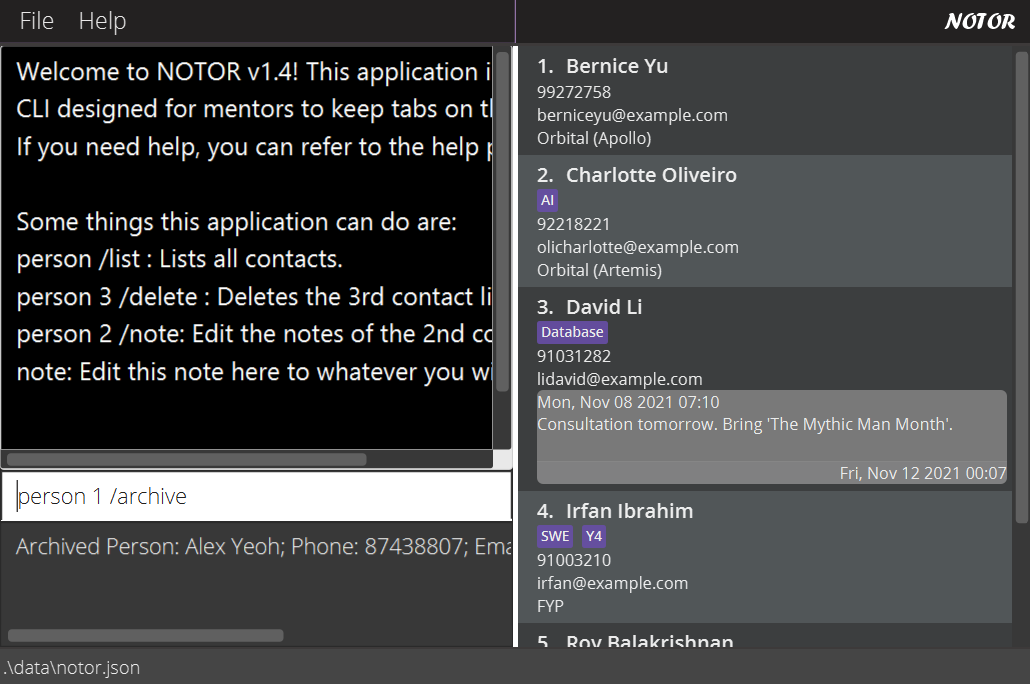
Archiving a person
Archives a single person by their index.
| Format | Example | What the example does |
|---|---|---|
person (INDEX) /archive |
person 1 /archive |
Archives the person at index 1
|
p (INDEX) /ar |
p 2 /ar |
Archives the person at index 2
|
Archiving All
Archives every person displayed in the List Pane.
| Format | Short Format |
|---|---|
person /archive |
p /ar |
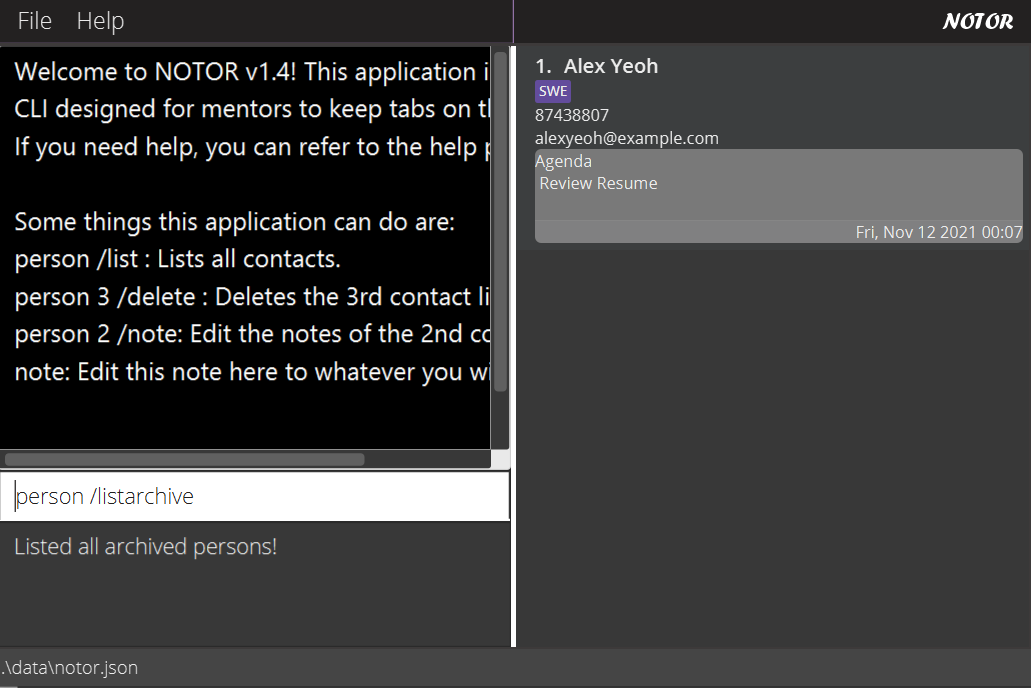
Listing Archived Persons
Shows the list of archived Persons.
| Format | Short Format |
|---|---|
person /listarchive |
p /lar |
Unarchiving
Restores an archived person back to your person list in Notor.
| Format | Example | What the example does |
|---|---|---|
person (INDEX) /unarchive |
p 1 /unarchive |
Restores archived person at index 1 back to your person list |
p (INDEX) /uar |
p 2 /uar |
Restores archived person at index 2 back to your person list |
Working with groups/subgroups
You can also create a group to organize people based on their common traits. In addition to groups, you can also create a subgroup of a group to organize people based on a more specific category.
![]() Tip:
You can sort your contacts in Notor by the group that they are in, as well as taking general notes
on the group. A few ideas on how you can use groups are:
Tip:
You can sort your contacts in Notor by the group that they are in, as well as taking general notes
on the group. A few ideas on how you can use groups are:
- Group people you tend to talk to together. When meeting them, you can sort your Notor by that group, so that you can reference just their contacts.
- Group mentees with common interests. This makes it convenient if you want to reach out to all mentees with a certain shared interest.
- Group mentees who you need to achieve certain checkpoints with. For example, if in your job as a mentor you must find out from every mentee a certain list of goals, you can put this checklist into Notor as a group note, then reference it as you contact each mentee.
Creating a group
Creates a group.
| Format | Example | What the example does |
|---|---|---|
group (GROUP_NAME) /create |
group Orbital /create |
Creates a group named Orbital
|
g (GROUP_NAME) /c |
g FYP /c |
Creates a group named FYP
|
![]() Note:
Note:
- You cannot create a group with name starting with a number, and the group name may contain
-or.characters. - The new group must not have a same name with other existing groups.
Deleting a group
Deletes an existing group at the specified index INDEX.
| Format | Example | What the example does |
|---|---|---|
group (INDEX) /delete |
group 1 /delete |
Deletes the group at index 1
|
g (INDEX) /d |
group 2 /d |
Deletes the group at index 2
|
Creating a subgroup
Creates a new subgroup.
| Format | Example | What the example does |
|---|---|---|
group (INDEX) /create n:SUBGROUP_NAME |
group 1 /create n:Artemis |
Creates a new subgroup named Artemis in group at index 1
|
g (INDEX) /c n:SUBGROUP_NAME |
g 2 /create n:Year2 |
Creates a new subgroup named Year2 in group at index 2
|
![]() Note:
Note:
- This name cannot start with a number, and it may contain
-or.characters. - The new subgroup must not have the same name as other existing subgroups in the same group.
Adding notes to a group or subgroup
Opens a pop-up note window to add note to a group or subgroup.
| Format | Example | What the example does |
|---|---|---|
group (INDEX) /note |
group 1 /note |
Opens a pop-up window where you can edit notes for group/subgroup at index 1
|
group (INDEX) /n |
g 2 /n |
Opens a pop-up window where you can edit notes for group/subgroup at index 2
|
Clearing notes of a group or subgroup
Removes the note of an existing group or subgroup.
| Format | Example | What the example does |
|---|---|---|
group (INDEX) /clearnote |
group 1 /clearnote |
Removes the note of group/subgroup at index 1
|
g (INDEX) /cn |
g 2 /cn |
Removes the note of group/subgroup at index 2
|
Filtering with Notor
Sometimes, you will want to view all people, groups, subgroups to understand what you have saved in your Notor. At other times, you will want to find those which fit into certain parameters. Here are the ways to view a subset of your data.
List
List can show all persons, groups, subgroups which you have added to Notor. It can also list archived persons: see Archiving People.
Listing all persons
Lists all persons in the List Pane.
| Format | Short Format |
|---|---|
person /list |
p /l |
Listing all groups
Lists all groups in the List Pane.
| Format | Short Format |
|---|---|
group /list |
g /l |
Listing all persons in a group or subgroup
Lists all persons in that group or subgroup.
| Format | Example | What the example does |
|---|---|---|
person (INDEX) /list |
person 2 /list |
Lists all persons in group/subgroup at index 2
|
p (INDEX) /l |
p 3 /l |
Lists all persons in group/subgroup at index 3
|
![]() Note:
Note:
- Only works if you have listed out all groups or subgroups in Notor.
- Lists all persons of a group or subgroup that is at the given
INDEX. - Do not confuse this with the list all subgroups command, whose first command word is
group.
Listing all subgroups in a group
Lists all the subgroups within a group.
| Format | Example | What the example does |
|---|---|---|
group (INDEX) /list |
group 3 /list |
Lists all subgroups of group at index 3
|
g (INDEX) /l |
g 2 /l |
Lists all subgroups of group at index 2
|
person.
Find
Find allows you to obtain the results that match with the keyword specified. You can filter in this way on people, groups, and subgroups. In addition, you may add additional parameters to your search, in order to narrow the search further.
Finding persons
Finds all persons that match your search term. You may search for partial matches within a persons name, or for tags the user must be tagged with. If you specify multiple search terms, only those people which match ALL criteria will be returned.
| Format | Example | What the example does |
|---|---|---|
person /find [n:NAME_QUERY] [t:TAG1, TAG2...] |
person /find n:Elton t:CS2103T |
Finds all persons that that match Elton with tag that match CS2103T
|
p /f [n:NAME_QUERY] [t:TAG1, TAG2...] |
p /f t:SWE |
Finds all persons with tag that match SWE
|
![]() Note:
Note:
- Finds all persons that match with given
NAME_QUERY, or are tagged with the tags specified. - The query for the name will match if the string exists within the name, regardless of case:
jowill matchJohnandjoanne. - Tags must be spelled exactly. You may specify more than one tag.
- While the parameters have been marked optional, you must specify at least one of the parameters if you want to filter the results.
Finding groups or subgroups
Finds all the groups/subgroups with the keyword specified. This will search for the keyword within the group’s name. Use after you have listed out all groups or subgroups.
| Format | Example | What the example does |
|---|---|---|
group /find n:QUERY_NAME |
group /find n:Artemis |
Finds all the groups/subgroups that match Artemis
|
g /f n:QUERY_NAME |
g /f n:CS2103 |
Finds all the groups/subgroups that match CS2103
|
![]() Note:
Note:
- Finds all the groups/subgroups that match the
KEYWORD. - If the name contains the whole keyword within it, it will match:
artwill matchArt Jammers,Smart cookie, andArtemis.
Miscellaneous information
Saving the data
Notor data are saved in the hard disk automatically after any command that changes the data. There is no need to save manually.
Editing the data file
Notor data are saved as a JSON file in Notor’s Directory. Advanced users are welcome to update data directly by editing that data file.
Tips on Using Notor
Keeping Track of Successfully Executed Command History
Notor keeps tracks of successfully executed commands in the current instance, allowing you to navigate through with Up arrow key starting from the most recent command. Users can also use the Down arrow key to navigate back to the more recent command when they are navigating with Up arrow key.
Keyboard Shortcuts
Notor has keyboard shortcuts to give you added convenience and allow you to control Notor using your keyboard alone. Here are the shortcuts we have available.
Pop-Up Window
You can navigate the buttons in a pop-up window using the arrow keys. On Windows and Linux, select the button by pressing enter; on MacOS, press space.
Shortcut Keys for Note Window
| Shortcut Key | Linux/Window | MacOS |
|---|---|---|
| TimeStamp | Ctrl + T |
Cmd + T |
| Save | Ctrl + S |
Cmd + S |
| Quit without Saving | Ctrl + W |
Cmd + W |
| Save and Quit | Ctrl + Q |
Cmd + Q |
![]() Note:
Note:
-
Timestamp: shortcut key types the current date and time in Note Window in this format
E, MMM dd yyyy HH:mm".
- Example:
Fri., Oct. 22 2021 00:07
Command Summary
![]() Note:
Note:
- Round brackets
()refer to COMPULSORY arguments. - Square brackets
[]refer to optional arguments.
General
Refer to the details of the general commands here.
| Action | Format | Short Format |
|---|---|---|
| Help | help |
h |
| Clear | clear |
c |
| Exit | exit |
e |
| Note | note |
n |
| Export | export |
exp |
Person
Refer to the details of Person commands here.
| Action | Format | Short Format |
|---|---|---|
| Create | person (NAME) /create [p:PHONE] [e:EMAIL] [t:TAG1,TAG2,...] [g:GROUP_INDEX] |
p (NAME) /c [p:phone] [e:email] [t:TAG1,TAG2,...] [g:GROUP_INDEX] |
| Edit | person (INDEX) /edit [n:NAME] [p:PHONE] [e:EMAIL] |
p (INDEX) /e [n:NAME] [p:phone] [e:email] |
| Delete | person (INDEX) /delete |
p (INDEX) /d |
| Add Group | person (INDEX) /add (g:GROUP_NAME) |
p (INDEX) /a (g:GROUP_NAME) |
| Add SubGroup | person (INDEX) /add (g:GROUP_NAME sg:SUBGROUP_NAME) |
p (INDEX) /a (g:GROUP_NAME sg:SUBGROUP_NAME) |
| Remove Group | person (INDEX) /remove (g:GROUP_NAME) |
p (INDEX) /r (g:GROUP_NAME) |
| Remove SubGroup | person (INDEX) /remove (g:GROUP_NAME sg:SUBGROUP_NAME) |
p (INDEX) /r (g:GROUP_NAME sg:SUBGROUP_NAME) |
| Note | person (INDEX) /note |
p (INDEX) /n |
| Clear Note | person (INDEX) /clearnote |
p (INDEX) /cn |
| Tag | person (INDEX) /tag [t:TAG1,TAG2,...] |
p (INDEX) /t [t:TAG1,TAG2,...] |
| Untag | person (INDEX) /untag [t:TAG1,TAG2,...] |
p (INDEX) /ut [t:TAG1,TAG2,...] |
| Clear Tags | person (INDEX) /cleartags |
p (INDEX) / ct |
| List Persons | person /list |
p /l |
| List Persons in Group or SubGroup | person (INDEX) /list |
p [INDEX] /l |
| Find | person /find (n:QUERY) |
p /f (n:QUERY) |
| Archive | person (INDEX) /archive |
p (INDEX) /ar |
| Archive All | person /archive |
p /ar |
| List Archived Persons | person /listarchive |
p /lar |
| Unarchive | person (INDEX) /unarchive |
p (INDEX) /uar |
![]() Caution:
For the Add and Remove commands, please make sure that the
Caution:
For the Add and Remove commands, please make sure that the GROUP_NAME is typed exactly as how it is spelt on
the card.
![]() Note:
Note:
- For the Create Person command, if you want to automatically add a person to a group,
please use the List Groups to list the groups first so that you can access them via the
GROUP_INDEX. - To view a list of persons in a particular subgroup, you should first use
group /listcommand to list out all the subgroups in the group the subgroup is contained in. Then list out the persons inside that subgroup via the List Persons in Group command with theGROUP_INDEXof the subgroup.
Group
Refer to the details of the group commands here.
| Action | Format | Short Format |
|---|---|---|
| Create Group | group (GROUP_NAME) /create |
g (GROUP_NAME) /c |
| Create Subgroup | group (INDEX) /create n:SUBGROUP_NAME |
g (INDEX) /c n:SUBGROUP_NAME |
| Delete | group (INDEX) /delete |
g (INDEX) /d |
| Note | group (INDEX) /note |
g (INDEX) /n |
| List Groups | group /list |
g /l |
| List Out Subgroups | group (INDEX) /list |
g (INDEX) /l |
| Find | group /find (n:QUERY) |
g /f (n:QUERY) |
g /list or g /find
to change the list display so that you can access the indexes of the group.
INDEX argument can be either a Group or a Person,
depending on what is in the list display.
You can change the list display using person /list or group /list.
FAQ
Q: How do I transfer my data to another Computer?
A: Install the app in the other computer and overwrite the empty data file it creates with the file that contains
the data of your previous Notor home folder.
What’s next!
In the future, we would like to implement these features to enhance the experiences of mentors in using Notor:
- View command for the viewing pane to support viewing other types of notes and command summary through the help command.
- Different UI settings for the users to choose the color scheme they prefer.
- Expand help window to improve user’s experience in looking for help.
- Import command to support importing data from CSV into Notor.
- Tagging for groups.
- And…more! Feel free to contact the team and share your suggestions at e0588244@u.nus.edu.
Appendix: Tutorial
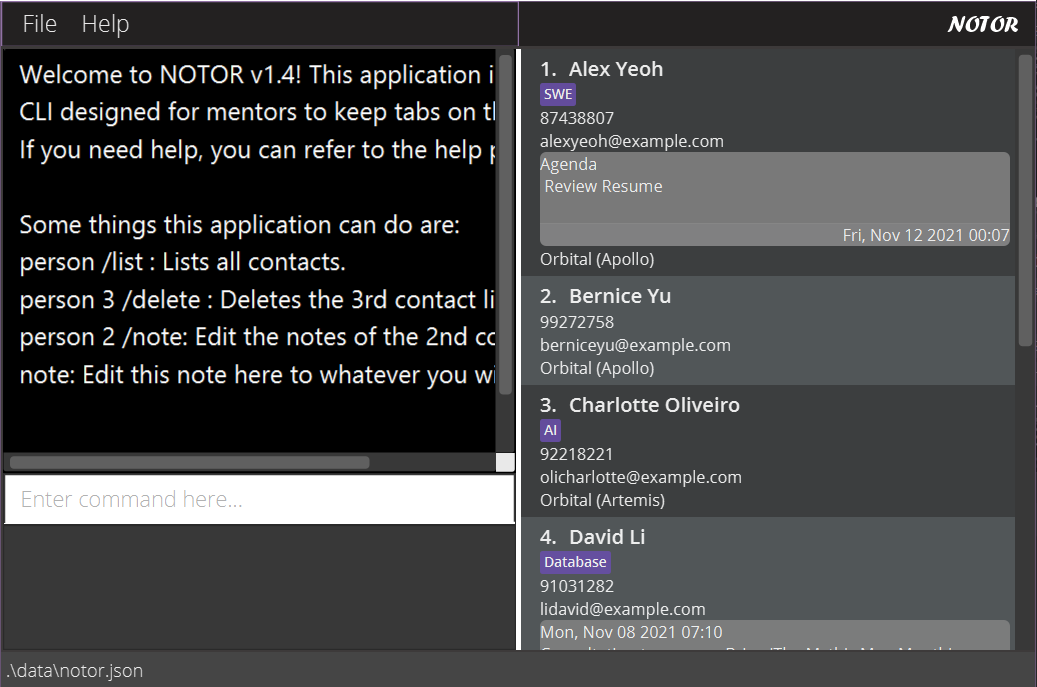
When you open Notor for the first time, you will see some dummy data for you to test out commands on. You can try out these commands sequentially to get familiar with Notor:
-
person /list: First, type this in to list all the people you have saved as contacts.
-
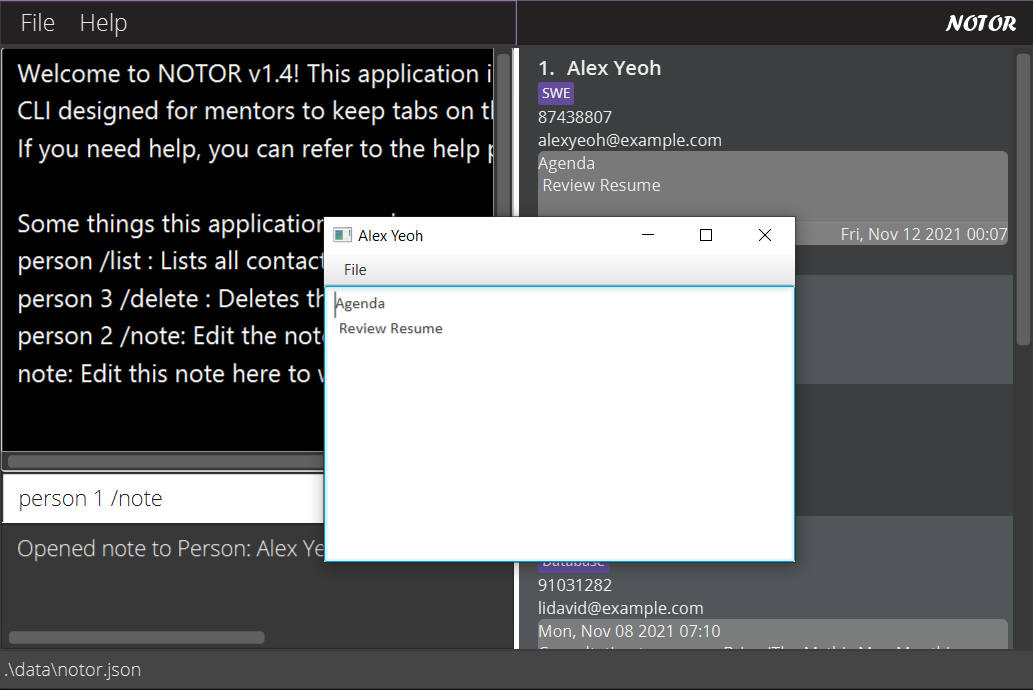
person 3 /delete: Use this command to delete the 3rd contact you have saved in Notor. This is the one listed at the 3rd index. In the example belowCharlotte Olivierowill be removed.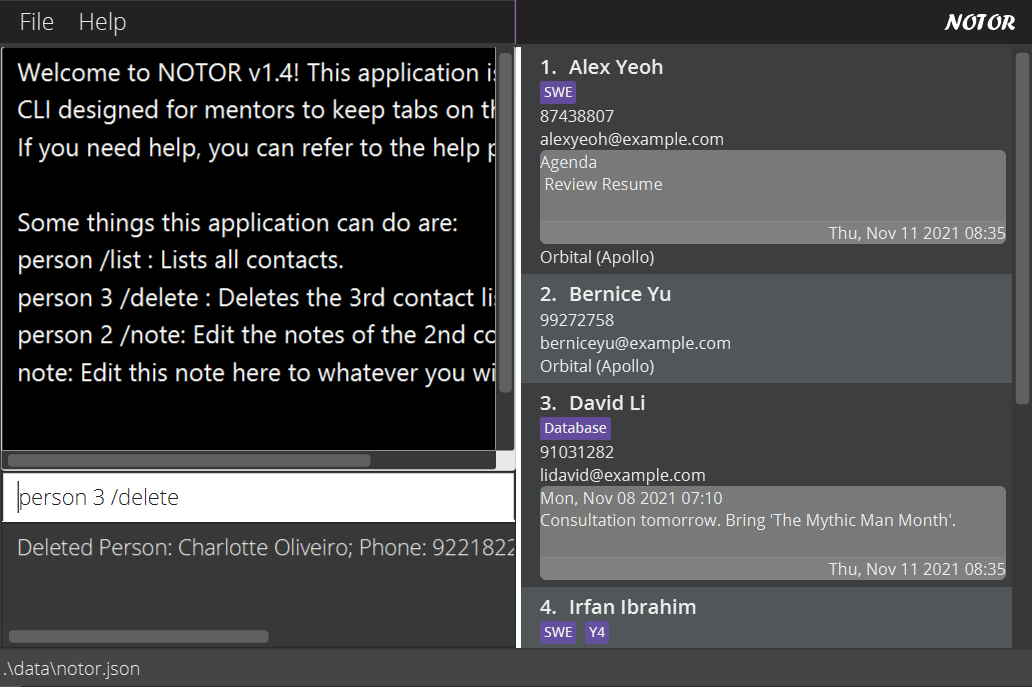
-
person User /create: To create a new contact person, type in this command. You can replaceUserwith a name of your choice.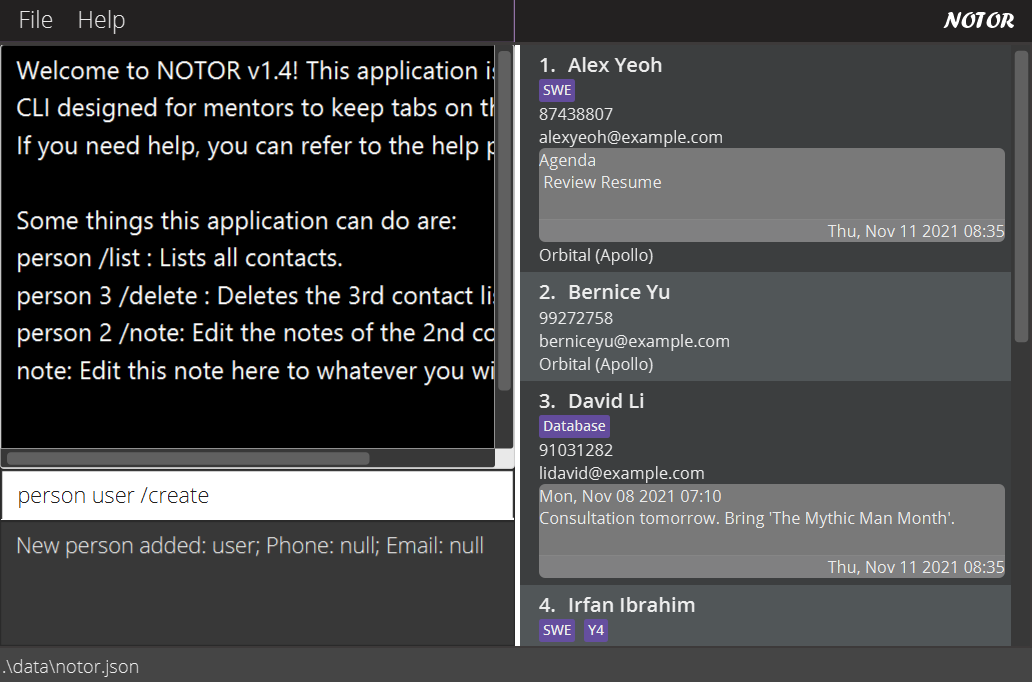
-
group CS2103T /create: To create a new group, type in this command. You can replaceCS2103Twith any group name you want.
-
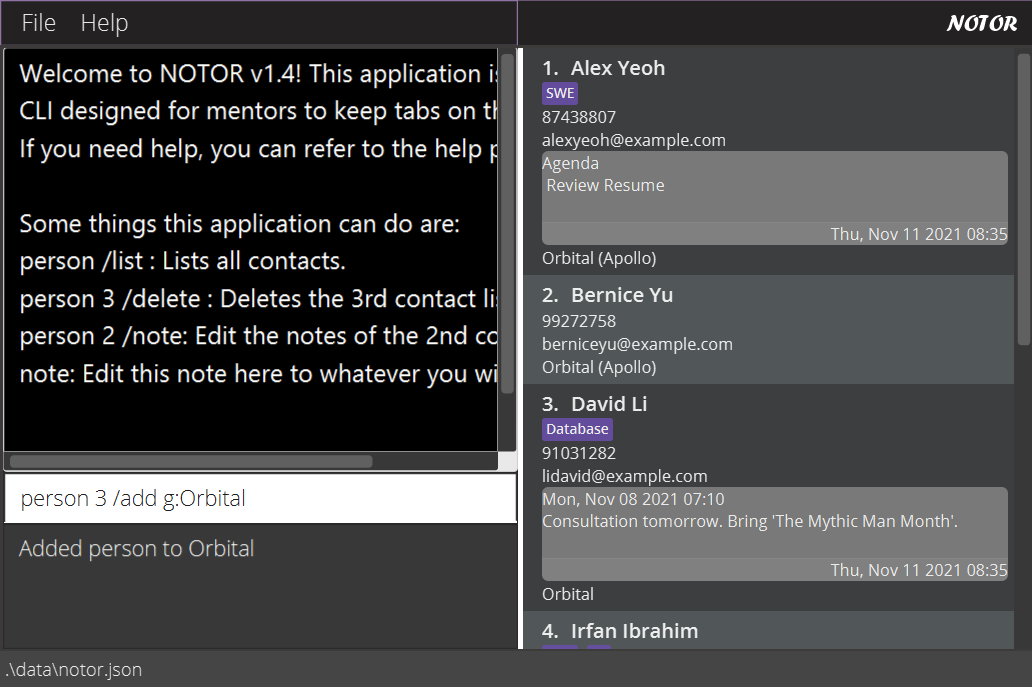
person 3 /add g:CS2103T: Now, if you want to add the person with index3to the groupCS2103T. In the example shown below, the user namedDavid Liwill be added to the groupCS2103T.
-
group /list: To refer to the current group list, you can simply type in this command.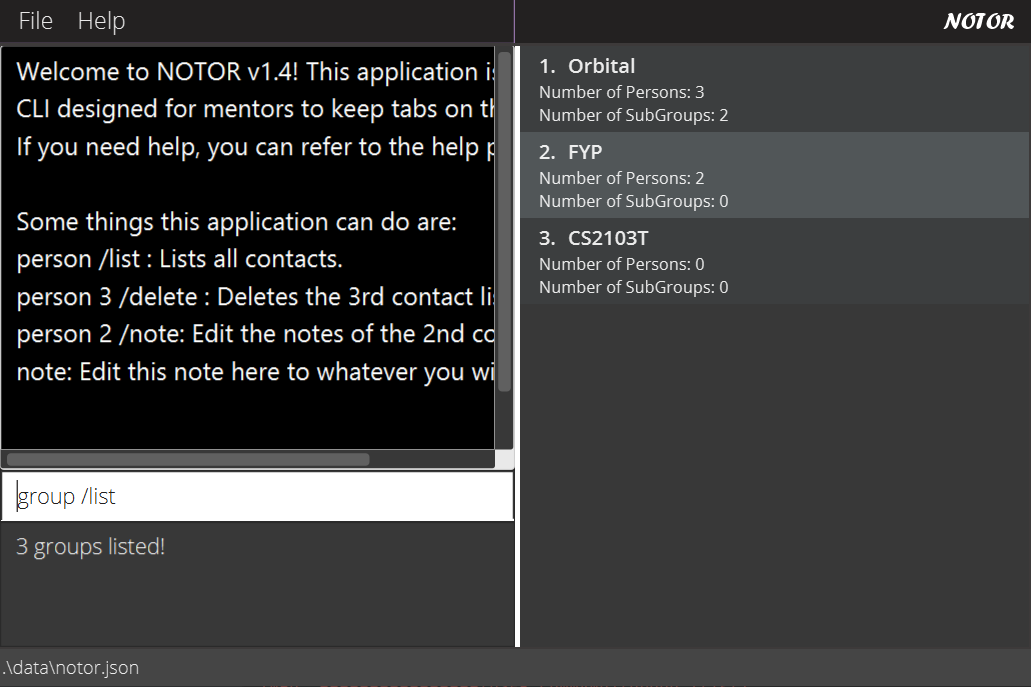
-
group 1 /note: Edit the notes of the group with index number1with this command – in the example below,Orbitalis the group you will take notes on.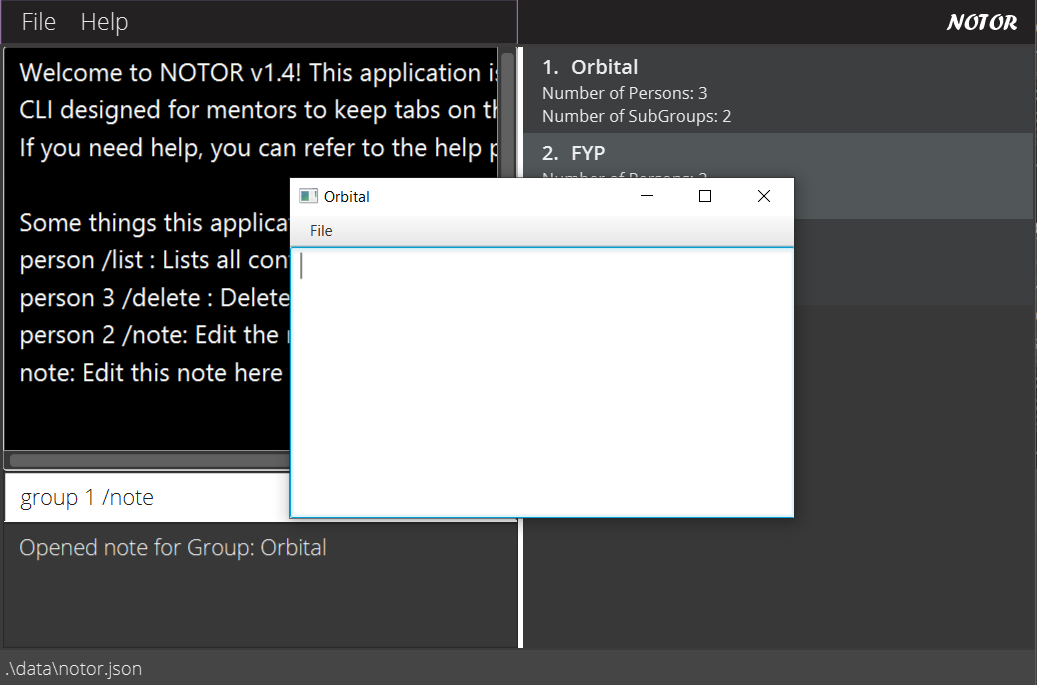
When the note window pops up, you can type whatever you like. Use the keyboard shortcutCtrl + Tto drop the timestamp you opened the note. When you are done, pressCtrl + Qto exit the note window and save what you wrote. -
group 1 /create n:Gemini: This command creates a new subgroup inside the group at index1. In the following example, a new subgroup calledOrbital_Geminiis created from the parent groupOrbital. The syntaxn:is to indicate the name of the subgroup you have created.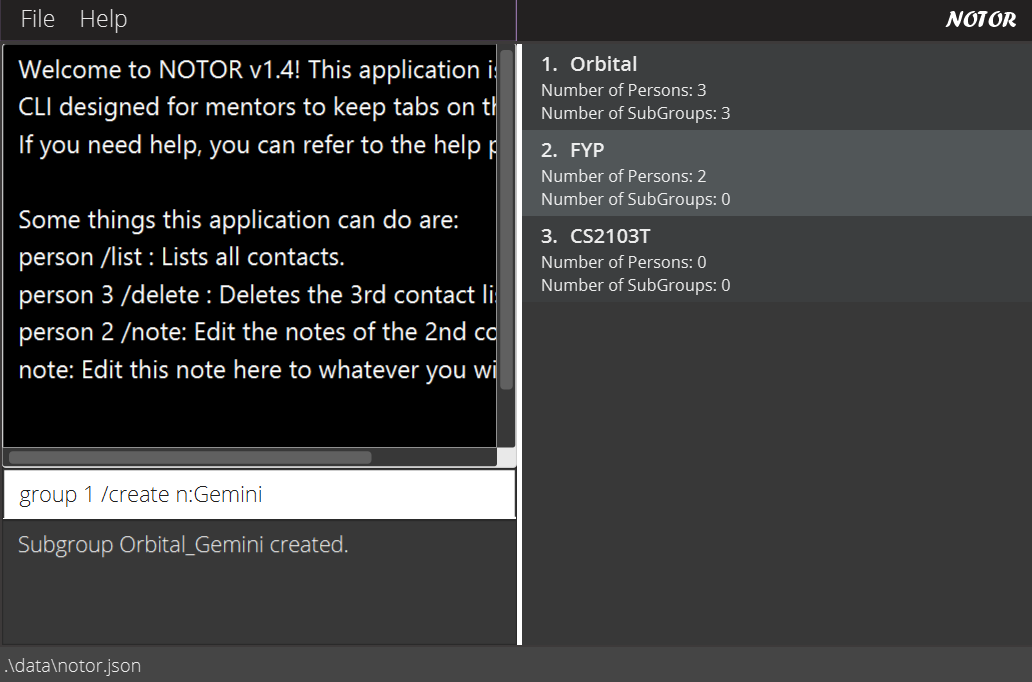
-
Test out whatever commands you like. When you’re done…
-
clear: Type this and hit enter to remove all the dummy data prepared for you.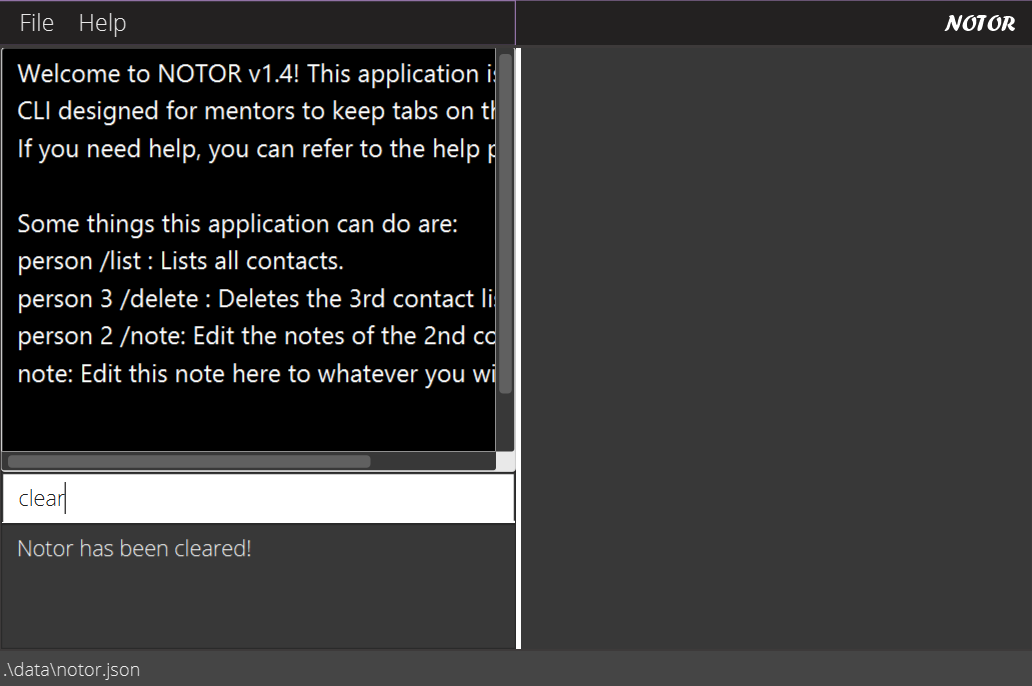
This will delete every contact and group in the list. A warning window will ask you to confirm your decision
-
exit: Finally, type in this command to exit the application and save all your data.
And that concludes this short tutorial. Check out Command Breakdown above for more details on each command.